
Installation
Parts List:
- 6 Backer Plates
- 2 Pre-assembled LEVEL-EZE Legs
- 12 Hex Nuts 1 Square Solid Aluminum Rod
- 1 Template
Tools Required:
- Hacksaw
- 7/16″ Wrench or Socket Set
- Center Punch
- Tape Measure
- Drill with 5/16″ Diameter Bit
- 1 1/4″ Hole Saw (needed only with riveted ladder rungs)
- Dust Mask and Gloves (fiberglass ladders)
- Adhesive Tape
- Marker or Pencil
Installation Instructions:
Before Beginning:
Identify all kit components required. If any components are missing or damaged, return to place of purchase.
Warning! – DO NOT SUBSTITUTE ANY COMPONENTS
- Ladders have fronts and backs. Place the ladder on its side with the front of the ladder away from you and extend the fly section (upper section) 3 rungs.
- If your ladder is a fiberglass ladder with riveted rungs, you will need to cut a hole through the siderail at the rung. If there are already rung holes through the siderail, skip to step 6.
- Locate attachment rivets to the siderail for the second rung from the bottom (four rivets per rung). Using a straight edge, draw diagonal lines between the corner rivets at the rung, creating an X. (See Diagram 1)
Diagram 1 (click to enlarge)
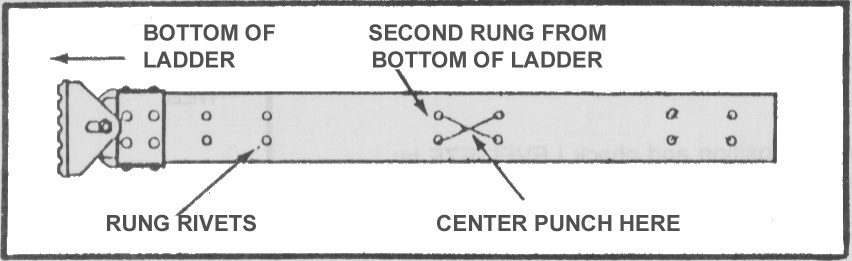
- Center punch intersection of X and, using a 1 1/4″ (32mm) hole saw, drill a hole at center punch mark. (See Diagram 1.) Use a dust mask and gloves when drilling fiberglass.
- Repeat steps 3 and 4 on opposite side rail.
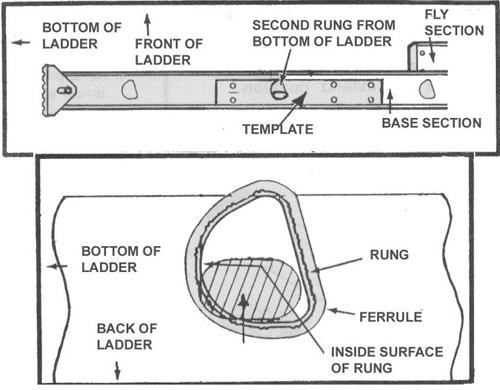
- For optimum performance, the leveler needs to remain as close to the back of the siderail as possible. Place the template over the second rung hole making sure that the top of the template faces the top of the ladder. Move the template flush to the back edge of the siderail of the ladder. Line up the bottom of the large hole in the template with the bottom edge of the rung hole. (See Diagram 2a)
Move the template toward the front of the ladder until you can no longer see the rung edge. Make sure that the bottom edge of the rung hole is still flush with the bottom edge of the hole in template. (See Diagram 2b)Diagram 2a/b (click to enlarge)
- Tape the template in place and mark each of the six screw holes with a punch. Draw a line along the bottom of the template and remove the template.
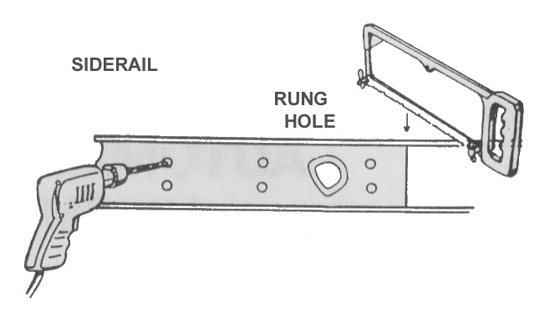
- Drill the 6 holes just marked on the siderail of the ladder using a 5/16″ (7.90 mm) drill. Using a hacksaw, cut off the siderail of the ladder at the line made at the bottom of the template. (See Diagram 3) Use a dust mask and gloves when drilling and cutting fiberglass.
Diagram 3 (click to enlarge)
- Turn the ladder over on the opposite side and repeat steps 6, 7 and 8, making sure you are standing in front of the ladder.
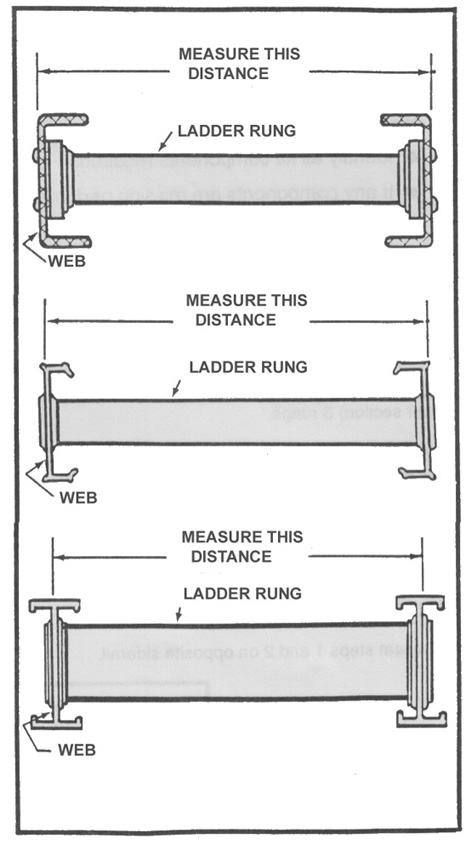
- The web is the portion of the siderail that connects to the rungs. Measure the width of your ladder from outside web to outside web across the ladder rung. (See Diagram 4) Add 2 3/8″ (60.3 mm) to that measurement and, using a hacksaw, cut the enclosed square aluminum rod to that length.
Example: 17 5/8″+ 2 3/8″= 20″ (447.7 mm + 60.3 mm = 508 mm.)Diagram 4 (click to enlarge)
- Lay the ladder down so it is flat. Insert the aluminum rod into the square shaft of the gear in one of the LEVEL-EZE legs and slide the leg into position, making sure the aluminum rod goes through the rung and that the six bolts go through the holes drilled into the siderail of the ladder. (See Diagram 5)
Diagram 5 (click to enlarge)
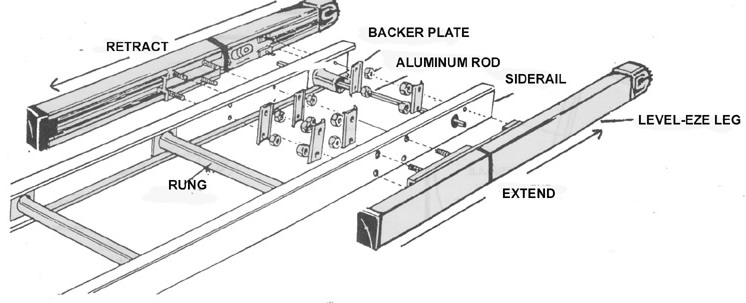
- Apply backer plates with nuts to this leg and lightly tighten all nuts. (Do not overtighten.) (See Diagram 5.) Once all nuts are lightly tightened, go back and tighten them snugly. DO NOT OVERTIGHTEN.
- Place the remaining LEVEL-EZE leg into position on the other siderail of the ladder making sure the square aluminum rod protruding through the ladder rung is inserted into the gear and that the six bolts go through the holes drilled in the siderails as in step 11 above. Repeat step 12.
- Cut the tape holding legs in position and check LEVEL-EZE functionality by pushing on one leg and making sure both legs move freely. Push on both legs at the same time to make sure that they lock. If the legs do not move freely or do not lock, remove and repeat steps 10, 11, 12, and 13. If the leveler still does not function properly, do not use the ladder but contact your employer, dealer, or manufacturer.
- Read all safety instructions on LEVEL-EZE leg before using.
- Use only manufacturer's swivel feet, or those feet specifically recommended by the ladder manufacturer for use with this product. Substitutions could result in unsafe interference with leveler or ladder.